Thursday, March 5, 2015

Eco dying

When a fossick at the op shop yielded a cream silk dress for $1, I knew straight away what I would do with it. I have dabbled in dying textiles with plants etc before but without really being invested if you know what I mean ... This time I decided to focus and see what I could create.


The dress will yield lots of strips of fabric and is really soft from lots of laundering. First I dampened it and scattered it with rusty nails.


A quick trip around the garden produced some eucalyptus bark and dried rose petals (don't have to dead head them now!)


I wrapped the whole lot around a rusted steel sheet that I had printmaking plans for, and bound it pretty tightly with binding wire.


Then it went into my make-shift dye pot where it steamed for a bit over an hour.


It looked fairly mucky when I took it out ...


I rinsed it in salty water and then plain water - it is still pretty gross looking if you ask me!


Once it was dry I washed it with a gentle soap and finally once it dried again it started to look halfway decent.


Apparently the gumtree bark is responsible for making the rusty things turn black. I like how you can kinda make out some of the shapes of the rusty nails. The pics are not really a fair representation as it looks quite a bit more subdued in reality. I love the organic marks and the way the colours melt into each other. 


Not quite India Flint standard but intriguing and well worth trying again! I am hopeful that I can incorporate some of my dyed textile into a piece of jewellery ...


Tuesday, February 10, 2015

Recycle, reclaim,reuse ...

I aim to use reclaimed materials as much as I can in my jewellery work. I enjoy both the freedom and the challenges these materials bring to the bench .... but sheesh, they can be hard work! Deconstructing things in order to reuse them can be pretty tough on my hands. Sometimes the only answer is to break out the angle-grinder, which I loathe, so I usually have to enlist the help of the ManBeast. 


Aluminium is the easiest by far - but look how grubby that stuff is! Eewwwww!


Silverplated trays can be quite hard to chop up by hand - you never really know what they are under that plating ....


Old copper and brass planters are wonderful and whilst I adore that green patina, it is notoriously unstable so I usually have to remove it before I start and then work a little alchemy if I want it back on the finished article! Getting reclaimed metal clean can be pretty labour intensive and I have a bunch of 'weapons' in my cleaning arsenal.


These soap pads are awesome! They are  usually the first things I use. I also love those green scourer pads. Recently I discovered that you can buy these little abrasive pads that fit into a flex-shaft or Dremel  ( one of the joys of being self-taught is it takes an age to discover the right tools! ). They work a treat and are great for small diddly bits  and they certainly save my hands but they are kinda expensive and I seemed to wear them out super quick. I decided to have a go at making my own. I got my wad punch and punched some out ...


I used a mandrel designed for a buffing thingo to put them into the Dremel. They worked a treat although I wore them out pretty quickly! Still, given that they cost about 2 cents a piece instead of 4 or more bucks, I am ok with that!


Brass and metal brushes - I have a bunch of different ones and these are excellent for cleaning but are also useful for pattern making on the softer metals. So there are a bunch of steps to go through before I can even start on the actual making. It gives me time to think ...


This piece has had a basic clean and a bit of a polish but will need to be scrubbed with steel wool and then progressively finer grades of emery paper (3M paper is a treat!). Eventually, it will look like this ...


Reclaiming metal is harder than buying new metal when you consider all the effort that goes into the process but I prefer it this way. I think it makes me more adventurous because the materials are inexpensive and that's a good thing because I seem to learn best from my stuff-ups! Of course the best reason for giving things a second life is that I am trying to tread lightly on this beautiful planet and still make lovely (frivolous) things! 
Scrub scrub scrub polish polish polish clean clean clean ...


Friday, January 2, 2015

Back at the bench

Ok, so I was a less than a diligent blogger in 2014 ... I guess I could declare my New Years Resolution to be to write more regularly but I am a bit sceptical about both Resolutions and my ability to stick to my good intentions ...
Let's just start and see where it leads us!
I recently had the pleasure of spending some teaching time with South Australian artist, JoJo Spook. JoJo loves making marks on metal and this inspired me to have a go at making some texture hammers.


I have a bunch of hammers gleaned from op shops, as well as a few cheapies that I was happy to sacrifice if the whole thing went pear-shaped!


This was my first victim. I cleaned up the surface, evened it out and gave it a polish. Then I took to it with a Deremel wheel and files, creating an abstract pattern across its face.


This is the pattern it created on a piece of metal.


This is what it looked like with a patina added and a bit of a polish. I like it!
Next I turned my attention to the narrow end of the hammer ...


Again I used the cut off wheel in my Dremel to make some random marks.


I like this result too! I had to go ahead and make a piece of jewellery with my 'new' tool ...


It's pretty simple but I think the organic nature of the marks makes it quite interesting. Next time I will have a go at making a more regular pattern on the hammer face - right now it is 41 degrees Celsius and I won't be using any tools that create a spark today!


Thursday, April 10, 2014

Chaos ...

It has been so chaotic around here for quite a long time now that my sanity has been under threat - well maybe not my sanity per say but my chi has been severely impacted!


Life has been full of scaffolding and support beams ...


Also holes, cement and temporary fencing.


Painters stuff and clutter everywhere ...


Ladders to avoid walking under!
But this is the reward - a wonderful, light, bright workspace!


Isn't it wonderful? All that space!! Sure beats the 3metre by 3 metre space I am used to working in. I am pretty much moved in but have decided to wait for permanent fixtures until I have the hang of the space.


The disruption in the household has made it difficult to settle into work mode but I have still managed to make a mess ... Printmaking has occupied all my time as I plan to graduate this year with a Major in printmaking. I have managed a few jewels - these are the first ones to be made exclusively in my new studio ...


I do believe happy dancing is in order!


http://m.youtube.com/watch?v=Q-GLuydiMe4&autoplay=1


Friday, March 14, 2014

Get tin' me sum cultcha ..

"The Adelaide Biennial is here and the Dark Heart exhibition is fantastic! It features some really great Aussie artists and I thought I would share a couple of my faves. I plan to go back for a second look because it was such a lot to take in. 

Kathryn Del Barton

Below is a detail from her nine meter long painting "heartland". del. Barton's work is often steeped in the feminine and this one is resplendent with feminine form ... and well, it is just so darn pretty as well! ('pretty' is often used as a criticism of her work - pfft!)


Fiona Hall

One of South Australia's very own artists, Fiona Hall has a room to herself entitled "out of my tree". The room is wallpapered with her skeleton drawings and full of skulls, installations , painted cuckoo clocks - well the list goes on. This artist loves to use the discards and found object in her work. She often incorporates textile processes in her work too. What's not to love?


Tony Albert

This installation is a fine example of the power of the multiple! Visually stunning, these houses of cards draw you in and then deliver a big political punch. Google Tony Albert and you will see he is an artist with an agenda - and I really like that!


Julia deVille
This woman has been a long time fave! She is a jeweller and among her many talents she is a crazy taxidermist! I know many find her work a bit creepy but I think it is just wonderful. I will let the pics do the talking ...


Hope that didn't freak you out too much! In context it is bloody brilliant! Today I found a piece of printed tin kicking about featuring a couple Victorianesque kittie ... So I thought I would make myself a little momento as a tribute to Ms DeVille's work ...


And guess what? The exhibition is FREE! Go Adelaide!


Sunday, March 9, 2014

Life is good ...

I live a fortunate life ... And I am grateful for it. I get to study in a creative space specifically designed for learning about and creating art. I live in a beautiful part of the countryside, my kids are independent and I can afford decent tequila. Doesn't get much better than that huh? Well, actually, it does! Every now an then an opportunity pops up that makes life seem absolutely golden ... let me explain ...
A few years ago, when I had first started at art school, I started to watch programmes on TV about art - probably because I felt that with a bit of education under my belt I might have a hope of relating to them! I caught a great doco about an Australian artist, David Frazer. I was amazed by his image making, his process, his subject matter and his approach. Really, I was dead impressed! Among other things (painting,drawing etc) David makes meticulous, highly detailed wood engravings and in the doco he travelled back to his small country hometown to make some images around ANZAC Day. The characters and scenery of his town were so familiar to me - as they would be to anyone who grew up in rural Australia. Have a squizz at some of his work  ...

                        Lest We Forget

                     Downward Mobility 2


                           Another Night On Earth by David Frazer

Now bear in mind that wood engravings are made using the end grain of special wood, lemonwood, box etc ... this means that the images are necessarily small for example, "Lest We Forget" is only 15x12cms! That's crazy small right?! Last year I got to see an exhibition of David's work in Adelaide and I was so excited to see them for real rather than on a screen or in a book! There is no colour in these images yet they are some of the most vibrant pictures I have come across. Yeah well, by now it must be obvious that I am a fan!
So what does that have to do with me counting my blessings and feeling pretty damn lucky? Well. On Friday I got to join in a workshop with the man himself! WTF I hear you exclaim!? Yup it's true. Accompanied by his lovely partner Sarah, Mr Frazer spent the day at AC Arts showing us how to make a wood engraving. IT. WAS. AWESOME. Lookee Lookee ...


David is showing Lucy (http://lucytimbrell.blogspot.com.au) how to put some finishing touches on her block ( that is David's lovely Sarah in the green top working hard on her own engraving)


Intense huh?! David however made it look easy!


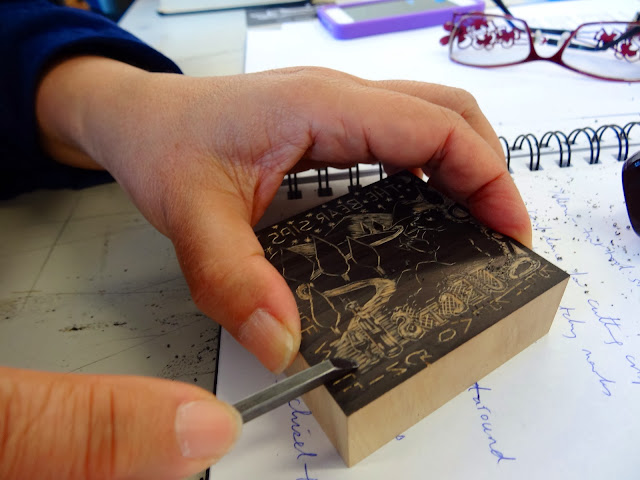
These are the clever hands of my friends, Mei Sheong-Wong ( another talented artist!), working on her block.


This is my little block inked up and ready to print.


My first ever wood engraving - I reckon I have a way to go but wow - I learned a lot!


I managed a small edition. All the students got to hang there work in the gallery that is hosting a show of David's work along with students from last years workshop. There was a time when I would have been too doubtful of my ability to join in such a workshop but I am so happy that I did. Given the "quality" of my print I clearly won't be giving up the jewellery making any time soon but it all adds to the tapestry right? . Meeting and being tutored by an artist you admire is a heady experience indeed. Yup, life is good!